Saturday, November 30, 2013

Center Console Project Plan - Subject to change (layout)

This is a rough Idea of my planned 'center console'.  There currently isn't one at all, and frankly it's a lot of no space there at all and a bit ugly.

The rough idea of the layout will be something like the image below.


I'll be using a 1/4" plywood, and small 1" sqr hardwood stock to keep the panels secure.  They'll be screwed in place and woodglued as well.  Once the main construction of the console is completed, and all the holes are cut (at least more of them).  I'll be using an old-school black quilted-leather material for the drivers and passengers sides of the console.  The center 'dial/shift' (top) panel will be covered with fake ostrich black leather.  Should be really cool looking when it's done.  And really original with a nod to the 60s with the quilted leather (found on ebay for a few bucks!).

Also note the battery, fuel-pump, ignition, fan switches at the top of the console.  These will replace the keyed-ignition-switch.  There will be a 'hidden master switch' that will enable/disable these switches.

Ignore the price noted on the drawing.  I have learned to grossly over-estimate planned projects for those 'just in case' times. LOL  40 years of doing various projects has taught me to always over estimate costs, because things NEVER seem to come in on a tight budget.  Most of the costs related to this are for the gauges themselves.  There are thousands of gauge manufacturers, and prices range dramatically.  I'm still researching the ones I will end up with.  'Autometer' makes some nice, reasonably priced ones, as well as PLX.  I like the fancy PLX sensors, but I'm not really convinced they're what I really want.  In the end, I don't care so much about 'fancy', but I do care about 100% function.

UPDATE: 

UPDATE 2:

The PLX digital gauge, and 3 sensors arrived today 12/6.  Unfortunately it's now a high of about 16F outside and 13" of fresh snow!  Guess I'll wait until things warm up to at least the freezing point now!  

UPDATE 3

Thursday, November 28, 2013

Wheel (Rim) Size


Current Setup:

  • Total width: 8"
  • Offset: 0mm (0")
  • Distance to Wheel-well: 4"
  • Distance to inside Frame: 3"
  • Tire Size: 195/70/R14
  • PCD: 5x114.3
  • NOTE: Inside distance reduction may require relocation of the E-Brake Cable

Here are some handy online wheel calculators

  • Rear Wheel Concept #1
    • Tire Size: 265/40/R17
    • Total Width: 10"
    • Offset: -37mm (-1.5")
    • 100% Clear of suspension
    • Wheel will stick out 2.8" more than OEM
    • Wheel will fill out well by an extra 7mm


Wheel Locator (by size)


140 Amp LCE Alternator (update)

The new alternator seems to work pretty well.  Although last night I was out driving in the cold (around 15F!) and I stopped to pick up some things at a gas station.  I left the truck running and on my way in to the store, I noticed a faint squeaking sounds from the area of the new alternator.  I'm hoping this isn't a bearing issue!  I suspect this is just a loose fan-belt.  The original and current fan belt seems loose, and there's not more space left on the alternator adjustment slide to tighten it up.  I think either the fan belt wasn't OEM so is just a tad to big for the application -OR- it's become a bit stretched.  I am unable to tighten it more than it is now.  So on Friday or Saturday I'll stop by Autozone and pickup a new one.  If that one is also loose, I'll run over to NAPA and ask them if they have one about 1/2" shorter which should get me into about the 1/2-way mark on the Alternator Slide bracket with room to spare for tensioning.

I'll post an update on this when I have one.  Keeping fingers crossed that it's not a bearing in the new Alternator!  That would suck because this alternator cost me $282.00!

Sunday, November 24, 2013

LCE 140 amp Alternator - Installed

This past Saturday I installed the new replacement LCE 140 amp Alternator.  The job only took about 1 hour.  It was supposed to be a direct replacement unbolt, replace, bolt up job.  However, I found I needed to remove about 1/16" of aluminum from the Alternator lower mount point (off the back side of it) to get it to fit in okay.  After that, it was just a matter of putting the drive belt back on, and running a new 8ga Hot lead to the battery.  Wham-bam-thank-you-maam and Bobs ur uncle .... done.  It was about 36F outside so thankfully it didn't take much longer.

Test drove it last night with the lights on High Beam, and the heater fan on, and the lights were indeed quite bright, and no dimming at stop signs and idle.  So this tells me it was a worthwhile job.  Not entirely a cheap replacement/upgrade, but under $300, and worth the effort I think.  The new alternator should be easily good for another 300k miles (fingers crossed).

PS: The new 'Stroker' Engine block was ordered and should be shipping this week, which will be the start of the Supercharged 2.6 Liter upgraded engine Build for the rest of this year, and into early Spring 2014.  There are quite a few bits left to order for this stage of the build up.  I'd be a bit ashamed to note the total expected cost for it.  (so I won't) but I totally expect it to be a worthwhile effort.  More on that later...

PSS: (Update) The new Stroker block is being machined to suite the 8.3:1 pistons and should be shipped out the week of Dec 9th.  They had to order the Forged 8.3:1 pistons in order to get the block done properly.  Which is a GOOD thing!  Those will be the pistons they send me when I order the Short Block Stroker Kit later this year.

Monday, November 18, 2013

2.6L Stroker Supercharger ~ Build Schedule


  • November 15, 2013
    • LCE 140 amp Alternator - Ordered 11/15/2013 (update should be shipping soon)
      • When the headlights are on, the lights dim at idle.  A good sign this needs replacing, and may as well get 2x the amps while I'm at it.
        • Another update this probably wasn't really needed so much since I adjusted the idle to handle the loads of lights on and heater fan running.  BUT at least I'll have a new one installed with 2x the output of the OEM! 
    • LCE Machined Stroker Block - Ordered 11/15/2013 (update will not ship for about 2wks while machining is being done to fit the new 8.3:1 .40 over pistons.  The upside is that by the time this ships the Stoker Shortblock kit will probably be ordered and arrive around the same time.)
      • (UPDATE) 12/5/2013 got word today that this block is finished and should be shipped out early next week. (Whoo Hoo!)
      • (UPDATE) 12/18/2013 New Block has arrived safe and sound!
  • November 29, 2013
    • LCE Pro Stroker Short Block Kit
      • Forged 8.3:1 Compression Ratio (same as Turbo pistons), which is good if I end up going Turbo down the road anyway.
    • LCE Dual Row Timing Chain Cover
  • December 13, 2013
    • LCE Stage 2 (or 3) Head
    • LCE Pro Block Brace
  • January 3, 2014
    • Camden Supercharger Kit

Sunday, November 17, 2013

Conversion 4-speed to 5-speed Manual Transmission

Marlin Crawler is world renouned for building the best Toyota Transmission - Bar None.

This is the 5-speed tranny I'd like to get: Here

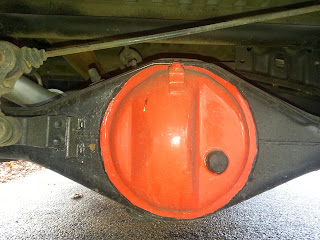
Identifying the Rear Diff 8" or 7.5" - in prep for Locker addon

So according to "off-road" because the Identification Plate shows a "G" this should be an 8" rear Diff.

And according to "4x4wire" based on the images they provided for rear-diff's this looks like an 8" rear Diff.

Marlin Crawler is world renouned for building the best Toyota Transmissions, and off-road truck setups.  This is the rear-locking Differential I'm considering: Here

The idea is that most vehicles that are 'on-road'/'street' vehicles don't use a 'Locker' rear end, instead they use something called a 'limited-slip'.  This is commonly seen when one wheel spins faster, or only one wheels spins when doing a burn out.  But the main reason limited-slip was created was to make going around corners smoother.  Since the 'inside wheel' on a turning vehicle spins less.  If you are forcing them both to spin the same you and up with wheel-hop, or tires chirping (sometimes).

In a performance vehicle you want as much traction as you can get.  In other words you want both rear wheels spinning.  Two wheels spinning with 'hookup' or get traction faster than one!


Sunday, November 10, 2013

Idle Jets, Dome Light and Tach Light

Yesterday I fiddled with a few things.  I setup the Weber 38/38 "Outlaw" Carb to use a 50 Idle Jet (stock was 45) on the Choke Side, and a 55 Idle Jet on the other side.  Initial setup had me around 3.5 turns out on the Fuel Mixture screws.  That's about 2x what Fuel Mixture screws should be turned out on this carb per the Weber and LCE.  

I'm using a spiral adapter plate under the carb.  More on this in a moment.

The Inside (closest to the head) Idle Jet is now turned out about 1/2 turn.

But I couldn't make the carb idle with a 55 Jet in the Choke side.  Even when its screwed in almost completely.  So I opted to use a 50 on the Choke side and a 55 on the Intake side.  This is counter to what Weber and LCE say to do.  So I'm pretty sure I'll be back in there.

I'm trying to get the Idle mixture screws OUT at about 1 full turn.  Which puts them in the middle of the 1/2 turn out and 1.5 turns out that both Weber and LCE recommend.

So back to the Spiral Adapter.  This adpater's Intake side throat is smaller than the Choke side throat.  Really looks more like it was intended for use with the 32/36 Weber.  Anyway...because of this mixed throat size I think this is probably why I'm not able to run the same sized Idle jets and get the Fuel Mixture screws turned out exactly the same.  That's my guess at this point.  And it also makes me wonder if I'm actually loosing some HP's with this Spiral Adapter.  This adapter is supposed to add 5-6hp due to improved atomization of the air/fuel mixture.

--------------------------

Anyway after getting that setup to be reasonably decent I resolved two nagging issues, and a 3rd one in the process.


  1. I fixed the dome light to at least be operational manually.  The previous owner (some old doode) had really butchered the wiring in the truck.  Long story-Short I put a fuse in that missing connected the dome light, cleaned the contacts on the light switch and presto "Light".  I just have to resolve how to get the Automatic light working when you open the doors.  This uses a ground-switch to turn it on and off.  The wire from the switch has been cut, or it's been replaced and never hooked up.  So I should just need to splice into the two-wire harness from the dome light to add this wire from the ground-switches in the doors.
  2. In the process of doing this, when I replaced the missing Fuse for the dome light, the dashboard clock came on!  Whoo Hoo!  BONUS!  (i didn't think that even worked)
  3. Hooked up the 12v Tachometer lamp to an ignition switched 12v source at the fuse box.  Now I can see the Tach at night.  Sweet.  LOL


Friday, November 8, 2013

Weber 38 Carb Tuning (2013-11-08)

Since I installed the new Weber 38, using an LCE Weber Spiral Adapter Plate to Stock Intake, I've been working at tuning it for this engine.  I've done a few things that would alter the stock setup of the Carb on this 22R motor.  Nothing radical really, but enough that things need to be better tuned on the Carb.  

For one thing the Carb as sold from LCE just comes as it would from the Weber OEM factory.  This carb is run on probably 100 different vehicles.  All requiring various tweaks to help the carb perform properly.

Some of the Mod's I've done on the 22R are:

  • LCE Pro Longtube Header
  • Mallory 70 Series Fuel Pump
  • Weber Redline Low-Pressure Fuel regulator (not entirely needed since the Mallory is adjustable from 3-12psi (this is just 'insurance' to make sure it's regulated).  The Weber 38 is a bit picky and requires 3psi Max.
  • Crane Cams HI6 Fireball ignition Kit with LX92 Coil.
Changing the air flow with a larger carb, a more open exhaust system, and an ignition kit that's like 12x better than the original OEM Toyota (or greater!) all effect the setting up of the Weber 38 and really means it will need to be tuned 'mo-bettah' than it comes out of the box.

When I bought this Weber 38, I also bought the performance Weber 38 Jet kit 701-DGS for the 38-DGES carb. (Thank Gawd I did).

Here is what I've done so far (today):

First here's what the results of initial changes and testing LOOK like!


  1. Removed the Vacuum Assist Brake hose from the Intake manifold and attached a $25 vacuum gauge from O'reilly's.  (This is 'old-school' method 'tune for max vacuum) when setting the Fuel Mixture screws.
  2. Start, and allow the engine to warm up. We should be OFF CHOKE Now...Top Flaps wide open.
  3. Adjust the IDLE SCREW to 1/2 turn IN.  NO MORE, NO LESS.
  4. Adjusted the Fuel Mixture screws OUT until the idle SOUNDED good and engine seemed relatively stable and calm.  (ie. not shaking around, or 'tractoring')
  5. Adjusted Fuel Mixture screws for Max Vacuum.  Which is actually different from Weber's documentation.
    1. When I started this (#5) the vacuum was at 18".
    2. I adjusted for Max vacuum and vacuum when to 20.5" (GOOD'er'er :-) 
    3. Now the good and bad News.
      1. BAD NEWS: I'm now 3.5 turns OUT on Fuel Mixture.  Weber docs say 1.5 turns out MAX!
      2. GOOD NEWS: this was then corrected by changing out the two Idle Jets that were 45's to 50's from my Jet Kit.
    4. End results after this is that the Idle screw is at 1/2 turn IN.  And the Fuel Mixture screws are 1.5 turns OUT.  This gets me to the outer limit of OK and per Weber requires another Idle Jet size larger.  So tomorrow I'll install the 55's from the Idle Jet Kit.  With the intent/hope of getting between 1/2 turn out on the Idle Screw and 1.5 turns out on the Fuel Mixture (and my old school check/setup for Max Vacuum as well.).
I test drove the truck after this latest round and found things to be A LOT BETTER!  (easy to notice).
  • 22R Engine idles as low as 650 RPM stable!  I set it to 750 RPM with the Idle Screw at 1/2 IN (750 rpm is per the OEM spec for Manual transmission, although I like 800 rpm better personally, Lights, Heater Fan on loads it just a bit but is still VERY stable)
  • Acceleration from a stop, has no hesitation anymore (there was a slight one prior to this latest round of tuning, nothing major if you expected it).
In the morning on 11/9 I'll up from the 50's to the 55's and readjust everything and see how that behaves.  While this set of changes has drastically improve cold start, idle and warm idle conditions, I can tell it still could be a bit better so that's what I'll work on tomorrow.

Once these things are done I am pretty sure I need to change more of the Jets.  Stop to Low speed, and low-mid range RPM's pull very nice now (although I think that can improve also).  I think the Higher RPM's should pull harder than they do.  It 'feels' like there's more there, but something's restricting it.  I suspect the other jets will need to be swapped out as well.

But this has put a really warm fuzzy feeling in my heart.  After spending all this money, and time installing things, and to start to see some more reliable results is really encouraging.

Sunday, November 3, 2013

Crane Cams Fireball HI-6 Ignition Kit

Hopefully today or soon anyway, I'll be installing the new Crane Cams Fireball HI-6 Ignition Kit I bought from LCE.

There are a LOT of nice features that come with this kit.  Crane Cams HI6 - Sold by LCE and HI-6/Digital Multi-Spark CD Ignition


  • LX92 Coil
  • Replaces the OEM coil with one that is around 12x stronger!
  • Built in Rev-Limiter
  • Ability to attach the TR-2 "Timing Retard" Adjustable in cab! (0-20 degrees selectable)
  • Ability to attach a MAP sensor for the Camden Supercharger.
  • MULTI-SPARK!!! (read: burn all that fuel for sure!, should provide a better response, and less wasted fuel!)
-------------------------------------------------------------------------------------------------------------------------------

Yep got it done, took a bit longer than I expected but here are the results. A note about the current state of the engine compartment :-)  It was pretty ugly in there when I first got this thing, and it's come a LOOOONG way since then with a much longer way to go.  This winter I'm hoping to pull this old 240k mile engine and replace it with a 2.6L Stroked and Supercharged engine.  I'm hoping that'll bring about 250-300hp.  When I do that I'll completely repaint and resolve any outstanding cosmetic issues in there.  Until then I'm still in the fitment stages of where I want everything, and making sure things work and are clean.


Update a few days after this post I found out how to get the rev-limiter set correctly...I've set it to 4,500 rpm.  And it kicks ass on Burn outs :-)  And sounds knarly!

Weber 38 Carb

Saturday, November 2, 2013

LCE - Camden Supercharger (High Boost) 10psi

"TBA" - I haven't built the motor for this to sit on yet, so I haven't bought/Installed the Supercharger yet.  The general thinking from LCE is that it will be a bolt on (in like 2-4 hours) instant 65-100hp increase!

However with added pressure comes added engine stress, so I'm first going to build up a "Stage 2 Stroker 2.6L" motor with 8:1 compression before I go into more detail on this item.

Stay Tuned!

LCE Stage 2, Pro Stroker 2.6L Motor


  • LCE Pro Block (Stroker Mod'd)
  • Pro Stroker Short Block Kit
    • Pro Stroker Crankshaft
    • LC Pro Connecting Rods
    • Clevite main, rod & thrust bearings
    • Brass freeze plugs
    • Complete gasket set
    • Water pump
    • LC Pro Oil Pump
    • Pro Head Studs
    • LC Dual Row Timing Chain Conversion Kit and Forged Pistons
    • Forged Pistons
  • ----------------------------------------------------------
  • Pro Block Brace Kit
  • 22R Timing Chain Cover ~ Dual Row LCE Conversion
  • New 2WD Oil Pan
  • Head Gasket Set
  • 6" Underdrive Pully Kit
  • Adjustable Dual Row Timing Gear
  • ----------------------------------------------------------
  • Stage 2 Cylinder Head
  • LCE Cam
  • Larger Valves
  • ----------------------------------------------------------
  • Lightweight Flywheel 22R (9lb!!!!)
  • New Rocker Arm Assembly
  • ----------------------------------------------------------
  • Camden 22R Supercharger (HI Boost 10psi) w/Weber inlet
  • ----------------------------------------------------------
  • Dual Comp Clutch Kit
  • ----------------------------------------------------------
  • Weber 38
  • Mallory 70 Series Fuel Pump
  • Weber LO pressure fuel regulator (w/0-15psi Gauge)

PCV

I never really put much thought into what a PCV actually does.  I just replaced the stupid valves ever so often to make sure they did whatever they're supposed to do LOL.

Turns out these little valve have a pretty important roll.  Over time fuel can seep past the cylinders into the motor oil and create a "gas" build up in the middle of the block, as well as while mixing with the engine oil create something known as 'sludge' which NO ONE WANTS because this add's a lot more wear and tear on motors also.

The PCV connects to a vacuum source and essentially evacuates this gas from the engine block as it circulates through vent holes in the engine block back up the the cylinder head and valve cover area.  This gas is brought into the intake manifold and sent back into the cylinders to be hopefully burnt and shot out the exhaust.

So...I made sure to reconnect the PCV when I swapped out the OEM carb for the Weber 38.  LCE provides a plate with a 3/8" vacuum hose nipple that attaches onto the intake manifold so that you can route these gasses from the PCV back into the intake as it should be.

Some folks completely remove the PCV.  This is probably a mistake for those who are just daily driver or weekend warrior drivers.  The guys who can get away with doing this would be those who are changing their oil ever race run or after each event because this probably isn't enough time to have sludge build up, and they're probably going to tare the motor down between runs or events anyway.  Other than that...be sure you have an operational PCV!  It'll save you a lot of headaches in the future!

Distributor & Ignition System

Yesterday I replaced the old OEM distributor with an LCE recurved Pro distributor.  Pix to come, but aside from the vacuum advance from the outside it looks almost identical to the OEM.  Not much to see here, but I did notice things seemed a lot smoother when I test drove it.


New LCE Header and Exhaust system


New Weber 38 Carb


Engine Compartment

Still too ugly to brag about yet.

The current scheduled clean up and modification will occur just before I install the new 22R 2.6L Supercharged motor.  Until then it's just kinda 'functional' yet clean.  If you want to see what it looks like NOW you'll just have to search for shots of it else where in this blog LOL I'm not proud of it yet.

But soon! :-)